分类 默认分类 下的文章

Using ArrayUtils.removeElement(Object[],Object)from org.apache.commons.lang is by far the easiest way to do this.int[] numbers = {1,2,3,4,5,6,7};//removing number 1
numbers =(int[])ArrayUtils.removeElement(numbers, 1); //1 是实际数组里面的值

当然也可以根据数组的索引进行移除,详情参考下方api


commons.apache.org library:Javadocs

maven引入
<!-- java执行 linux 命令  -->
<dependency>
<groupId>ch.ethz.ganymed</groupId>
<artifactId>ganymed-ssh2</artifactId>
<version>262</version>
</dependency>

import org.springframework.core.io.ClassPathResource; import org.springframework.util.ResourceUtils; import java.io.*; import java.util.ArrayList; import java.util.List; import ch.ethz.ssh2.*; import ch.ethz.ssh2.StreamGobbler; /** * Created by Administrator on 2017/8/18 018. */ public class Test { public static List<String> l = new ArrayList<String>(); public static void main(String args[]) { exportSvnCommend();//初始化list String hostname = "172.1.1.1"; String username = ""; String password = ""; try { /* Create a connection instance * * pom add <dependency> <groupId>ch.ethz.ganymed</groupId> <artifactId>ganymed-ssh2</artifactId> <version>262</version> </dependency> * * * */ Connection conn = new Connection(hostname); /* Now connect */ conn.connect(); /* Authenticate. * If you get an IOException saying something like * "Authentication method password not supported by the server at this stage." * then please check the FAQ. */ boolean isAuthenticated = conn.authenticateWithPassword(username, password); if (isAuthenticated == false) throw new IOException("Authentication failed."); //************************ for循环执行命令*******************start*********************** /** * throw new IOException("A remote execution has already started.");所以如果需要执行多条命令 * ,则把多条命令柔和为1条命令,命令之前用回车\n连接,这样就可以成功执行,拿到所有的控制台输出内容 */ String cmd = ""; // cmd = "whereis java"; //test // cmd = "svnadmin create /usr/local/Repositories/item1"; for (int i =0;i<l.size();i++){ String itemName = l.get(i); //创建资源库并导入 cmd += "svnadmin create /home/SvnRepositories/"+itemName+"\n";//可以一次执行多个命令 cmd += "svnadmin load /home/SvnRepositories/"+itemName+" < /home/SvnRepositories/svnbak/svnbak/"+itemName+".dump"+"\n";//可以一次执行多个命令 execLinuxCommend(cmd,conn); } //************************ for循环执行命令************end****************************** /* Close the connection */ conn.close(); } catch (Exception e) { e.printStackTrace(); e.printStackTrace(System.err); System.exit(2); } } public static void execLinuxCommend(String cmd,Connection conn){ try { /* Create a session */ Session sess = conn.openSession(); sess.execCommand(cmd); System.out.println("Here is some information about the remote host:"); /* * This basic example does not handle stderr, which is sometimes dangerous * (please read the FAQ). */ InputStream stdout = new StreamGobbler(sess.getStdout()); BufferedReader br = new BufferedReader(new InputStreamReader(stdout)); while (true) { String line = br.readLine(); if (line == null) break; System.out.println(line); } /* Show exit status, if available (otherwise "null") */ System.out.println("ExitCode: " + sess.getExitStatus()); /* Close this session */ sess.close(); }catch (Exception e){ e.printStackTrace();; } } //批量导出windows visualSVN的资源文件备份命令 public static void exportSvnCommend(){ try{ // File cfgFile = ResourceUtils.getFile("classpath:1.txt"); File file = ResourceUtils.getFile("classpath:1.txt"); BufferedReader reader = null; try { reader = new BufferedReader(new FileReader(file)); String tempString = null; int line = 1; // 一次读入一行,直到读入null为文件结束 while ((tempString = reader.readLine()) != null) { // 显示行号 // System.out.println("line " + line + ": " + tempString); System.out.println("svnadmin dump F:\\Repositories\\" + tempString + " > F:\\svnbak\\"+tempString+".dump"); l.add(tempString); line++; } reader.close(); } catch (Exception e) { e.printStackTrace(); } finally { if (reader != null) { try { reader.close(); } catch (Exception e1) { e1.printStackTrace(); } } } }catch (Exception e){ e.printStackTrace(); } } }


一、备份VisualSVN项目

1. 现在要使用Linux作为svn服务器,之前是在windows Server 2008上的,用的是VisualSVN


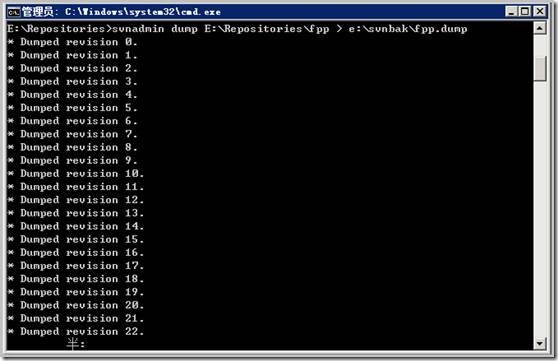
2.现在svn中有一个项目fpp,需要将fpp这个项目导出到linux环境下。运行cmd,输入命令 svnadmin dump E:\Repositories\fpp > e:\svnbak\fpp.dump将项目导出到e:\svnbak目录下。运行结果如下:

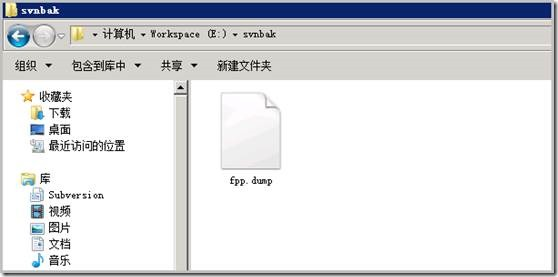
3. 可见命令会导出每个版本的详细信息,保证了之前的历史信息不会丢失。现在我们便得出备份文件fpp.dump,如下:

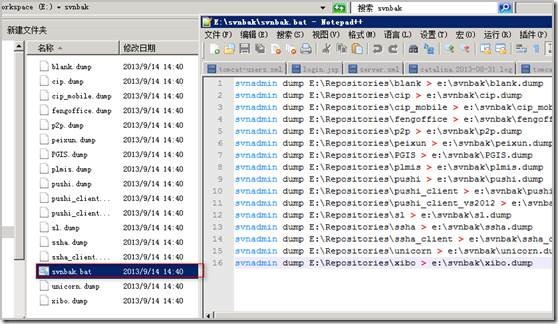
4. 利用批处理实现项目的批量导出,编写svnbak.bat, 双击运行,会一次性导出所有项目,结果如下图:


二、上传备份文件到Linux

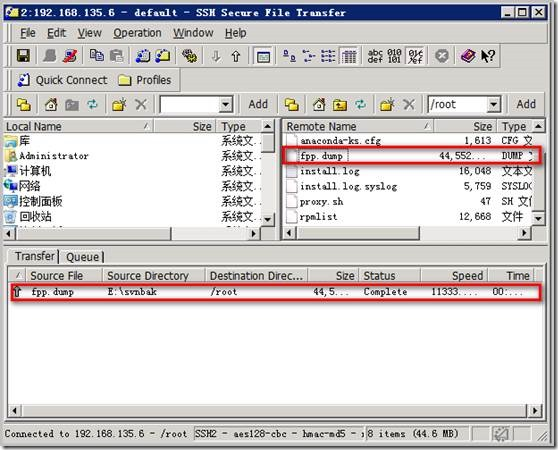
1. 利用ftp, ssh等工具将fpp.dump文件传输到Linux服务器上,这里利用直接利用openSSH这个软件上传。如图,文件上传成功,文件的路径为/root/fpp.dump。


三、Linux下SVN的安装与配置

1. Linux下安装svn,这里直接利用yum命令进行安装。yum install subversion完成subversion的安装。

2. 建立版本库目录svndata。

mkdir /svndata

svnserve -d -r /svndata #启动svn,设置版本库目录为/svndata

killall svnserve #关闭svn

3. 建立项目库

svnadmin create /svndata/fpp

4. 配置用户访问权限

cd /svndata/fpp/conf

vi svnserve.conf

释放如下几行的注释

anon-access=none

auth-access=write

password-db=passwd

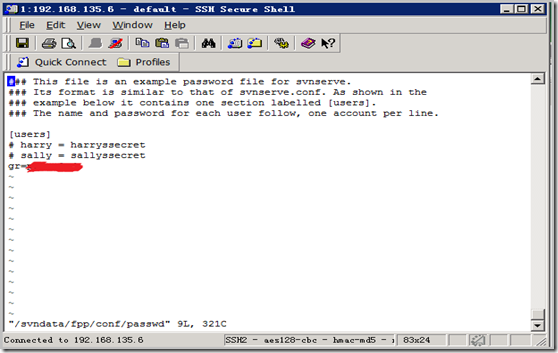
5. 增加访问用户,格式为(username = password),等号两边要加空格,否则无效。如下图,没有加空格,就一直没用:


6. svn的命令这里不作介绍,大家自己去学习使用。

四、导入备份文件

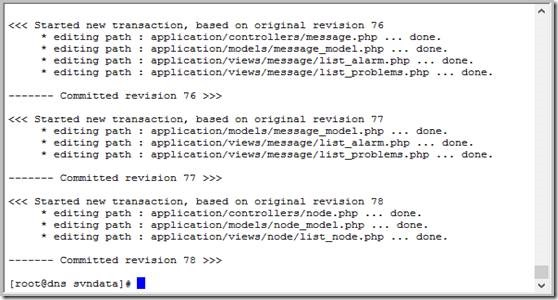
1. 输入命令:svnadmin load /svndata/fpp < /root/fpp.dump,运行结果如下:


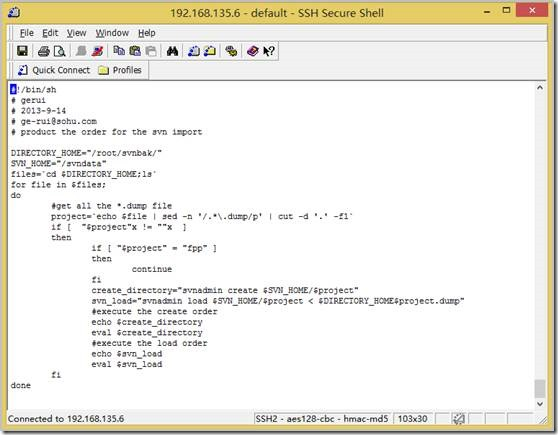
2. 为了避免逐个导入项目,所以写了一个shell脚本,进行批量导入,遍历备份目录下所有*.dump文件,并产生相应的导入命令,15个项目,花了10分钟左右完成导入,脚本如下:


五、客户端进行代码的检出

1.windows端安装TortoiseSVN, 右键svn checkout

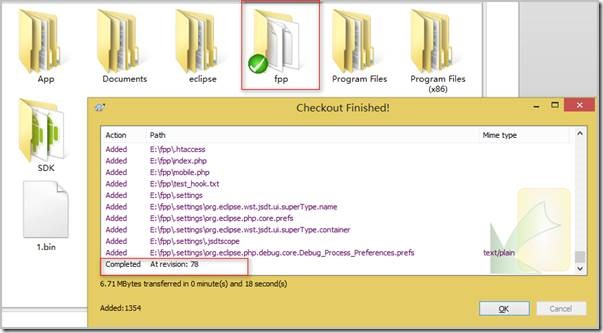
2. 在打开的对话框中,输入svn库的地址,确定便可以同步项目。地址如下,ip地址加项目名称,如图:


3. svn提示检出成功,在目录下可以找到检出的项目。


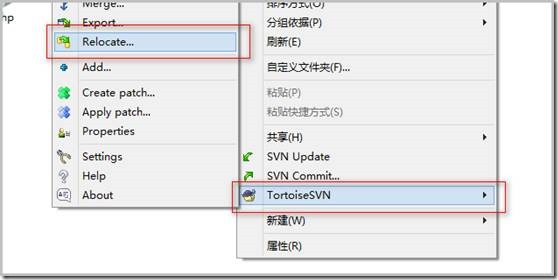
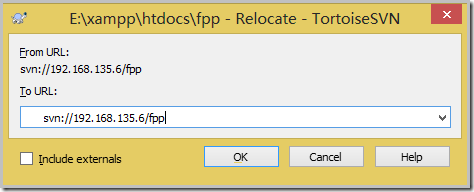
4. 对于以前的项目,重定向到新的svn服务器,右键->TortoiseSVN->Relocate,在弹出的对话框中填写新的地址,TortoiseSVN会提示修改成功,之后,就可以使用新的svn了。


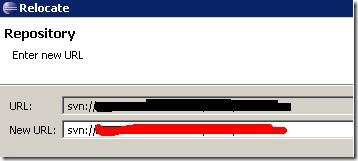
5. 如果你是使用eclipse中的subeclipse的插件,首先打开svn资源库视图,然后选择你的项目,右键选择重定向,填入新的svn地址。


6. linux下若使用svn命令的话,形式如下:

svn switch --relocate (Old Repository Root) (New Repository Root)


VisualSVN Server仓库迁移到Linux(包含所有版本, 权限,用户信息)

公司开发服务器从Windows换成CentOS,所以要把原服务都转移到Linux下,MySQL、SMB的迁移都很顺利,但是SVN的转移却遇到了些问题,花费了三天时间,走了不少弯路,现在总算解决了SVN迁移问题,记录下:

在Windows上我们是用VisualSVN Server作SVN服务的,Linux上是编译安装的subversion 1.7.7。
Windows 的SVN仓库在E:\SVNRepositories,Linux在 /data/svnrepos

第1步,导出VisualSVN仓库:svnadmin dump E:\SVNRepositories\repo1 E:\repo1.dump

第2步,在Linux端create相同名称的仓库: svnadmin create /data/svnrepos/repo1

第3步,在Linux端load Windows导出的库:
            cd /data/svnrepos
            svnadmin load repo1 < repo1.dump

到此为止,repo1库就导入到Linux的subversion中了,但是用户信息、权限信息还没导入(这也是我折腾很久的问题),继续:

第4步,把E:\SVNRepositories\authz 上传到 /data/svnrepos
            把E:\SVNRepositories\htpasswd 复制为 passwd 并修改后上传到 /data/svnrepos
            修改后的passwd格式如下(其实就是用户名 = 密码):
             [users]
             user1 = 123
             user2 = 456

第5步,修改仓库的/conf/svnserve.conf,使它指向第4步上传的那两个文件:
            [general]
            anon-access = none
            auth-access = write
            password-db = ../../passwd
            authz-db = ../../authz

到这里就完成了,用命令  svnserve -d -r  /data/svnrepos/ 启动subversion服务。

  • 这样做还有个问题是passwd文件原密码信息全丢失了,知道解决方法的请留言告诉我:)
    打开passwd可以看到之前的密码是加密的,而放到linux上,需是明文,修改密码到明文即可。
  • 我只用了repo1这个仓库,如果有多个仓库一样步骤,分别导出导入,并修改仓库的/conf/svnserve.conf
     [此步骤,可以利用linux批量查找替换功能,将密码文件指定到../../的passwd文件]
  • 如果按照上述方法操作还是不行,启动svnserve时用  --log-file ./log.txt参数查看错误信息


常用命令总结:

#启动svn,设置版本库目录为/Repositories
svnserve
-d -r /usr/local/Repositories

#关闭svn
killall svnserve


windows服务器导出:
svnadmin dump F:\Repositories\item1
>F:\svnbak\item1.dump

创建项目资源
svnadmin create
/usr/local/Repositories/item1

还原备份文件到资源库
svnadmin load
/usr/local/Repositories/item1 < /usr/local/Repositories/item1.dump

svn导出路径
svn:
//172.16.28.70/item1


Android Things Developer Preview 5

10 August 2017
Posted by Wayne Piekarski, Developer Advocate for IoT

Today, we're releasing Developer Preview 5 (DP5) of Android Things, which includes the major change of being based on the upcoming Android O release. Android Things is Google's platform to enable Android Developers to create Internet of Things (IoT) devices, and seamlessly scale from prototype to production.

Android O

Android O is currently under Developer Preview for phones and tablets, and DP5 is now based on this upcoming release (previous releases were based on Android N). This means that your future Android Things applications should target API 26 to work correctly on the platform with our support libraries.

Hardware Changes

DP5 now adds support for the new NXP SprIoT i.MX6UL design, as listed in our developer kits documentation. With Intel discontinuing the Edison and Joule hardware designs, these platforms are moving to legacy support. They will not continue to receive the latest platform updates, but developers may continue to access the DP4.1 system images from the Android Things Console.

An important goal of Android Things is to help developers seamlessly scale from prototype to production. When we exit Developer Preview, we will differentiate between hardware platforms targeted for prototyping-only and hardware reference designs that can scale to production. Production-ready hardware will satisfy Google's security requirements and include long term support from the silicon manufacturers. We will have more to share later on.

Improvements

With the move to the Android O codebase, there are new API features from Android as well as specific features for Android Things. For those developers using UserDriver APIs, you will need to add new permissions to your AndroidManifest.xml. The documentation contains details about the permissions needed for each driver type. DP5 also now supports OpenGL ES 2.0 and WebView on the Raspberry Pi 3, which was a highly requested feature from developers. We have also implemented dynamic pin muxing for the Raspberry Pi 3, with pins being configured at runtime depending on what features are being used.

Android Studio

The samples for Android Things are now available directly in Android Studio for browsing and importing. You can now go to File, New, Import Samples, and search for Things to see everything that is available. We have a wide range of samples, demonstrating how to interact with buttons, sensors, LEDs, and displays, as well as implementing Google Assistant and TensorFlow.

Android Things Console

We recently launched the Android Things Console, which provides the ability to support over-the-air updates (OTA) to Android Things devices. We have recently made a number of UX improvements to the console to improve usability and functionality. DP5 is now available within the Android Things Console, but the DP5 update will not be pushed automatically to devices without your intervention. You will need to update your application for DP5, then create a new update and push it via the console yourself.

Feedback

With Android Things being updated to Android O, significant changes have been made to the platform. Please send us your feedback by filing bug reports and feature requests, and asking any questions on Stack Overflow. To start using DP5, use the Android Things Consoleto download system images and update existing devices. More information about the changes are available in the release notes. You can also join Google's IoT Developers Community on Google+, a great resource to get updates and discuss ideas. Also, we have our new hackster.io community, where everyone can share the amazing projects they have built!


今天,我们发布了Android Things的“开发者预览5”(DP5),其中包括基于即将推出的Android O版本的重大变化。 Android Things是Google的平台,可让Android开发人员创建物联网(IoT)设备,并从原型到生产无缝扩展。

Android O

目前,Android O正在针对手机和平板电脑进行开发人员预览,DP5现在基于此即将推出的版本(以前的版本基于Android N)。这意味着您未来的Android Things应用程序应该使用API​​ 26在平台上使用我们的支持库来正常工作。

硬件更改

DP5现在增加了对我们的开发工具包文档中列出的新型NXP SprIoT i.MX6UL设计的支持。随着英特尔停止使用爱迪生和焦耳硬件设计,这些平台正在转向传统支持。他们不会继续收到最新的平台更新,但开发人员可能会继续访问Android事件控制台中的DP4.1系统映像。

Android的一个重要目标是帮助开发人员从原型到生产无缝扩展。当我们退出Developer Preview时,我们将区分针对原型的硬件平台和可扩展到生产的硬件参考设计。生产就绪的硬件将满足Google的安全要求,并包括硅制造商的长期支持。我们稍后会有更多的分享。

改进

随着移动到Android O代码库,Android有新的API功能以及Android Things的特定功能。对于那些使用UserDriver API的开发人员,您需要向AndroidManifest.xml添加新的权限。该文档包含有关每种驱动程序类型所需权限的详细信息。 DP5现在还在Raspberry Pi 3上支持OpenGL ES 2.0和WebView,这是开发人员非常需要的功能。我们还为Raspberry Pi 3实现了动态引脚复用,根据使用的功能,在运行时配置引脚。

Android Studio

Android的样品现在可以直接在Android Studio中进行浏览和导入。您现在可以转到文件,新建,导入样品,然后搜索“事物”,查看可用的所有内容。我们有各种样品,展示如何与按钮,传感器,LED和显示器进行交互,以及实施Google Assistant和TensorFlow。

Android事情控制台

我们最近推出了Android Things Console,它提供了支持Android Things设备的无线更新(OTA)功能。我们最近对控制台进行了许多改进,以提高可用性和功能。 DP5现在在Android事件控制台中可用,但DP5更新不会自动推送到设备,无需您的干预。您将需要更新DP5的应用程序,然后创建一个新的更新,并通过控制台自己推送它。

反馈

随着Android系统更新到Android O,平台已经发生了重大变化。请通过提交错误报告和功能请求向我们发送您的反馈,并在Stack Overflow上提出任何问题。要开始使用DP5,请使用Android Things Console下载系统映像并更新现有设备。有关更改的更多信息,请参见发行说明。您也可以在Google+上加入Google的IoT Developers社区,这是获取更新和讨论想法的绝佳资源。另外,我们有新的hackster.io社区,每个人都可以分享他们建立的惊人的项目!

【荐读】珍惜愿意批评你的人,那是你生命中的贵人

2017-08-03

人民日报

1


  有人喜欢在街头算命,听到一句自己会有“贵人相助”,心里往往会高兴好一阵子。


  在许多人心底,大多都有一个贵人相助的祈盼,希望真的有那么一位贵人,能够动动小手指头,就一下子改变自己的命运,省去我们许多奋斗的时间和磨难。


  只是,这样的贵人恐怕可遇而不可求,我们一辈子都难以遇到。


  不过,在我们的生命里,却时时可能遇到另一种贵人,他能够让你的人生少走弯路,加快你成长的步伐,让你离成功越来越近。


  这样的人,就是能够真诚对你提出批评的人。


2


  有些人喜欢“见人只说三分话,未可全抛一片心”,会说话、说好话的人多,能够对你直言缺点和不足的人少。


  俗话说,心善之人敢直言,一个敢于对你的缺点直言相告的人,肯定是一个心地善良的人,肯定是一个人品好的人。


  比起那些一见面就夸奖,让你感觉自己简直就是一个完人的人,能批评你、指出你缺点的人才更值得去珍惜。


  因为,我们并不是完人。听好话虽然让我们感到舒服,但没有太多的营养,甚至可能有害,让我们的缺点暴露于众人的眼光之下而不自知。


  相对于那些夸我们貌比天仙的人,告诉你牙上沾着菜叶的人,才是真心为了你好,这样的人才更值得相交。


3

  陈毅元帅有诗云:“难得是诤友,当面敢批评。”


  著名画家黄永玉就是这样的诤友。


  黄永玉对曹禺先生年轻时创作的《雷雨》《日出》和《原野》推崇备至,许多台词都能背下来,但对曹禺在晚年没有写出相应的佳作很不满意。


  他给曹禺写信道:“我不喜欢你解放后的戏,一个也不喜欢。你心不在戏里,你为势位所误!”


  令人称道的是,曹禺受到这样尖锐的批评之后,认真反思,给黄永玉回了一封长信,表示“你射中了我的要害”“你鼓励了我,你指责我近三十余年的空洞……我浪费了‘成熟的中年’,到了今日——这个年纪,才开始明白。”


  并且,曹禺还将黄永玉的信装裱起来,作为对自己的警示。


  君子因誉而情疏,因诤而友密。


  黄永玉和曹禺,就是一个动人的实例。


4


  朋友也罢,伴侣也罢,有一个能够批评我们的人,那是一种福分。


  很多时候,我们每个人都是手电筒,只能照见别人,而看不见自己。


  所以,我们需要以人为镜。毫不夸张地说,能找到一面好的“镜子”,决定着我们人生的走向。


  不靠谱的夸奖,可能让人愉悦于一时,但只会让你不断重复着人生的错误而不自觉,最终蹉跎了岁月。


  有一个人,能够直接指出你的缺点,并善意进行提醒,才会让我们的人生少走弯路,走向成功。


  如果在你的身边有这样的人,请珍惜他吧,因为,这就是你要找的生命中的贵人。


来源:明珠絮语(ID:tsliuchanghai),作者:遗君明珠,时评人,自媒体平台作者。侧重于教育、美文、人生感悟

本期编辑:崔鹏、蒋波


觉得不错,请点赞↓


祝您天天开心,生活幸福!
免责声明
本博客部分内容来自于互联网,不代表作者的观点和立场,如若侵犯到您的权益,请联系[email protected]。我们会在24小时内进行删除。